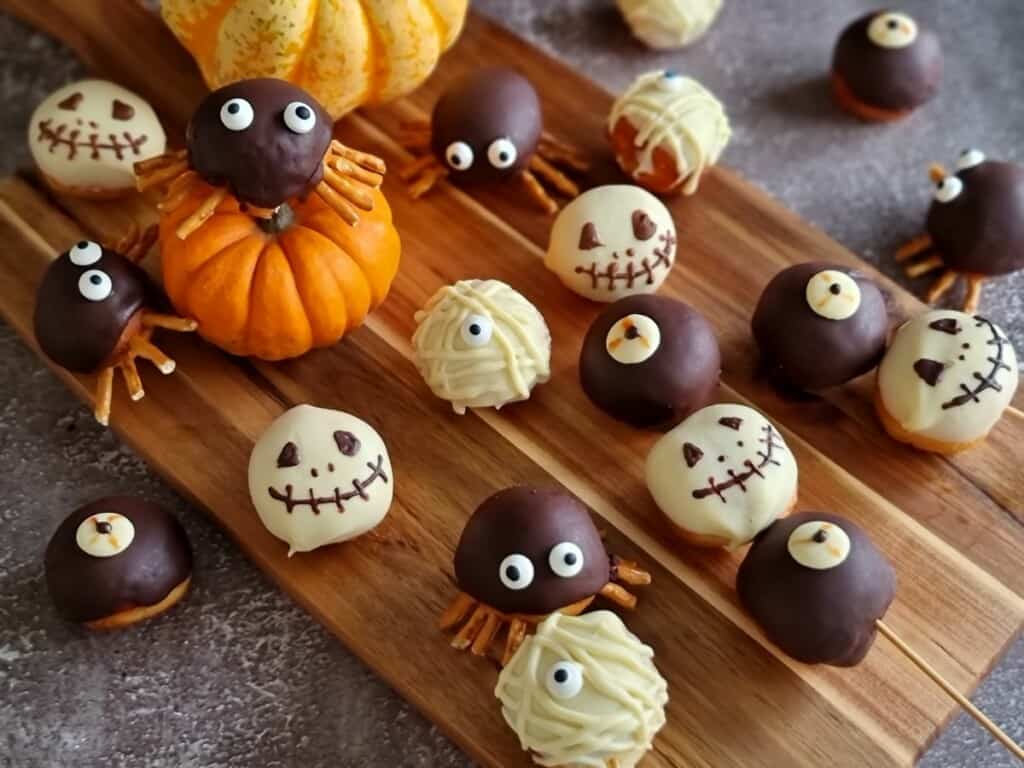
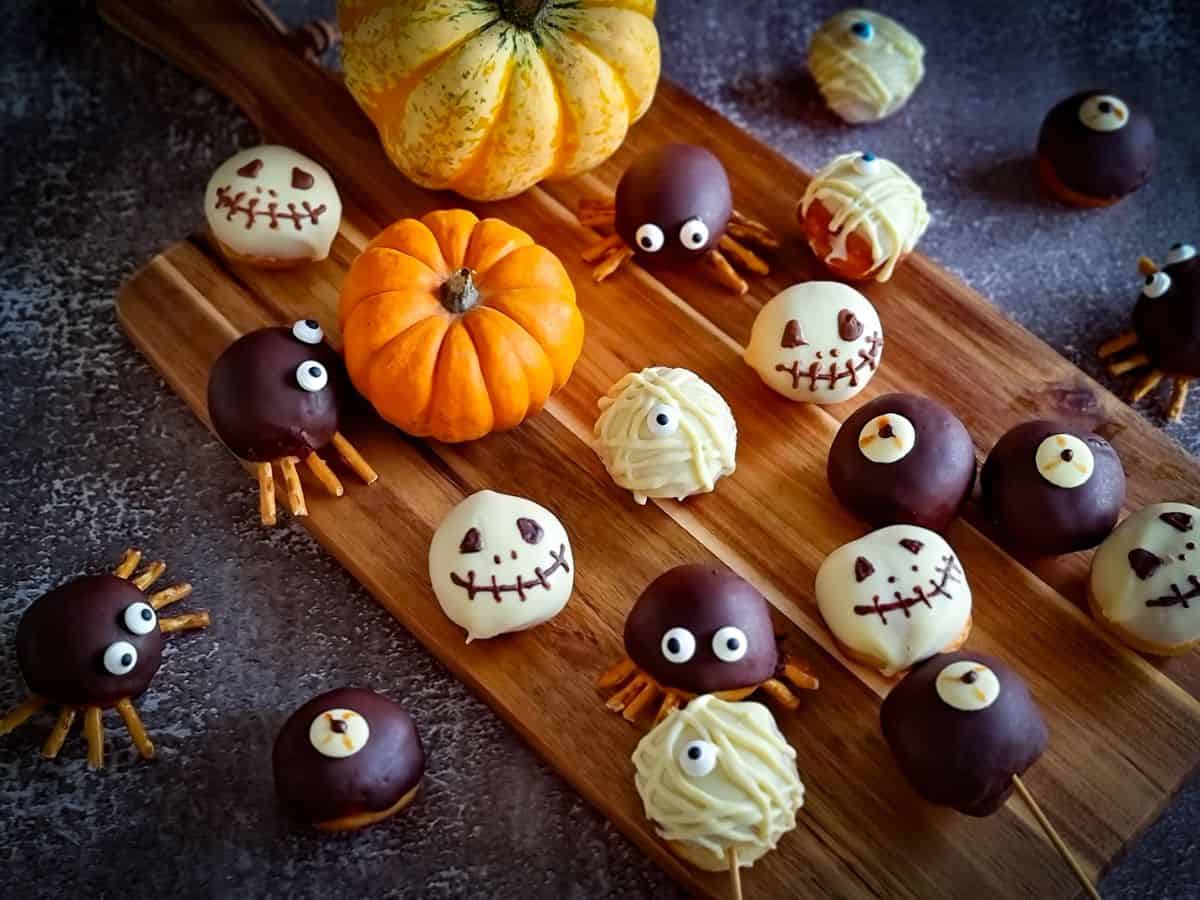
These mini donuts characters are perfect treats for a Halloween party; they are fluffy and soft on the inside, and coated with chocolate on the outside. They are delicious and irresistible. For the Halloween season, I designed characters to look cute and horror-themed. For different seasons, you can design different characters and have fun with children. Draw anything you like.
How to make the dough
- Add the all dry ingredients together and mix it well.
- Add beaten egg into milk and mix, then add into dry ingredients and give it good mix.
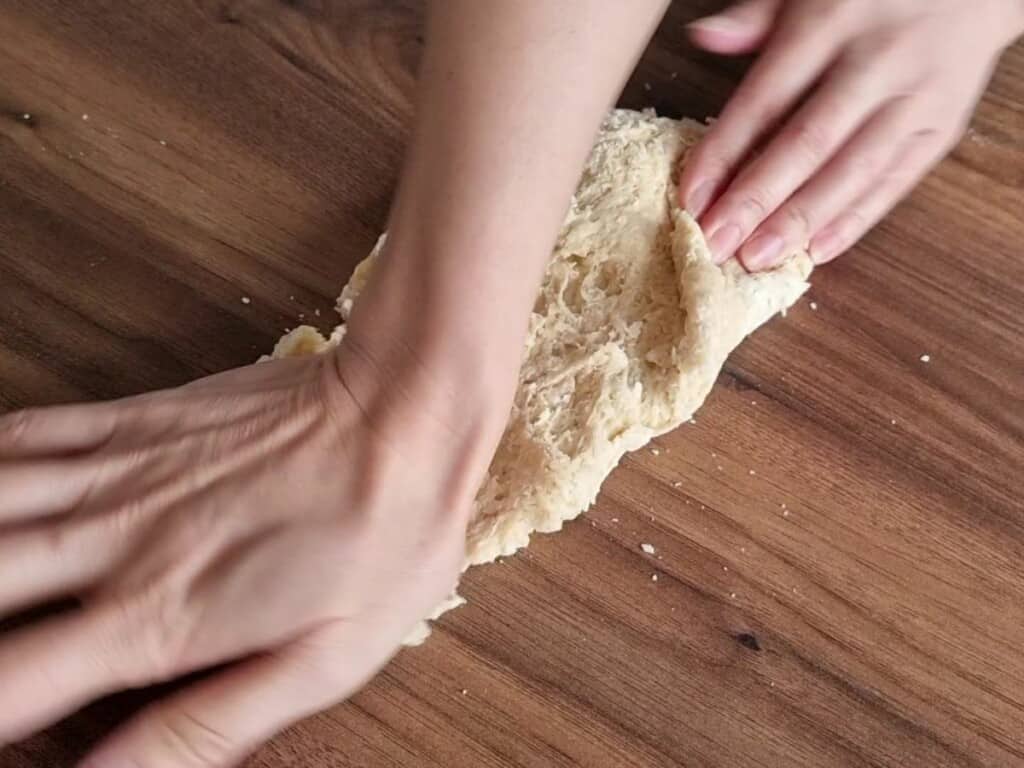
- Remove the dough from bowl onto surface and start to knead it for 3 – 5 minutes.
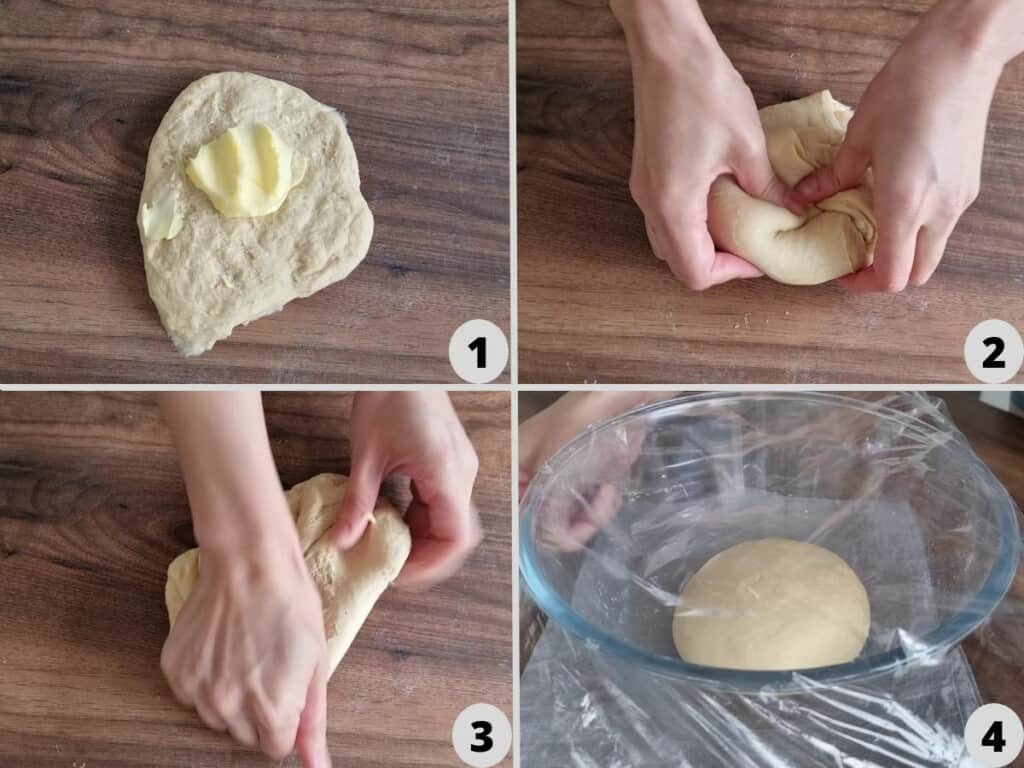
- Spare the dough and add the unsalted butter on the middle of the dough and cover with the dough. Knead it for another 10 minutes.
- Once dough become smooth, roll the dough into a round and put it into the bowl cover with wrap.
- Do first ferment for 40 – 50 minutes or until doubled in size in warm place.
- Remove the dough onto the surface and gently push the air out.
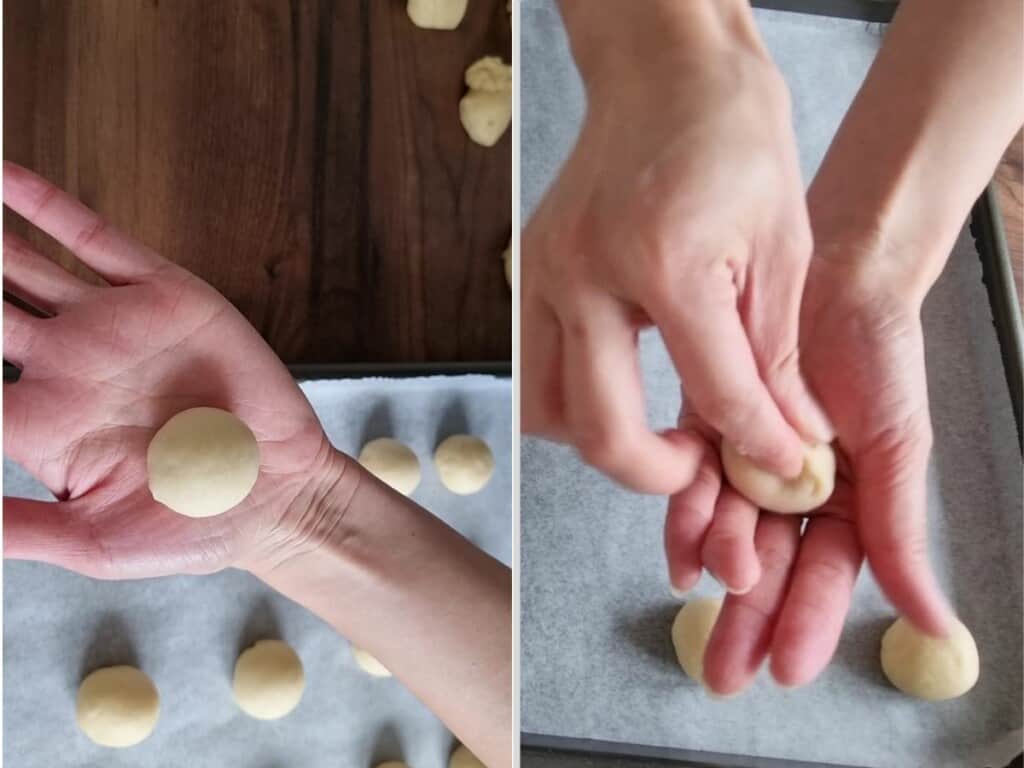
- Divide into 23 pieces each dough around 15g – 16g.
- Roll each piece into a ball.
- Place the balls onto baking trays and give them space to grow.
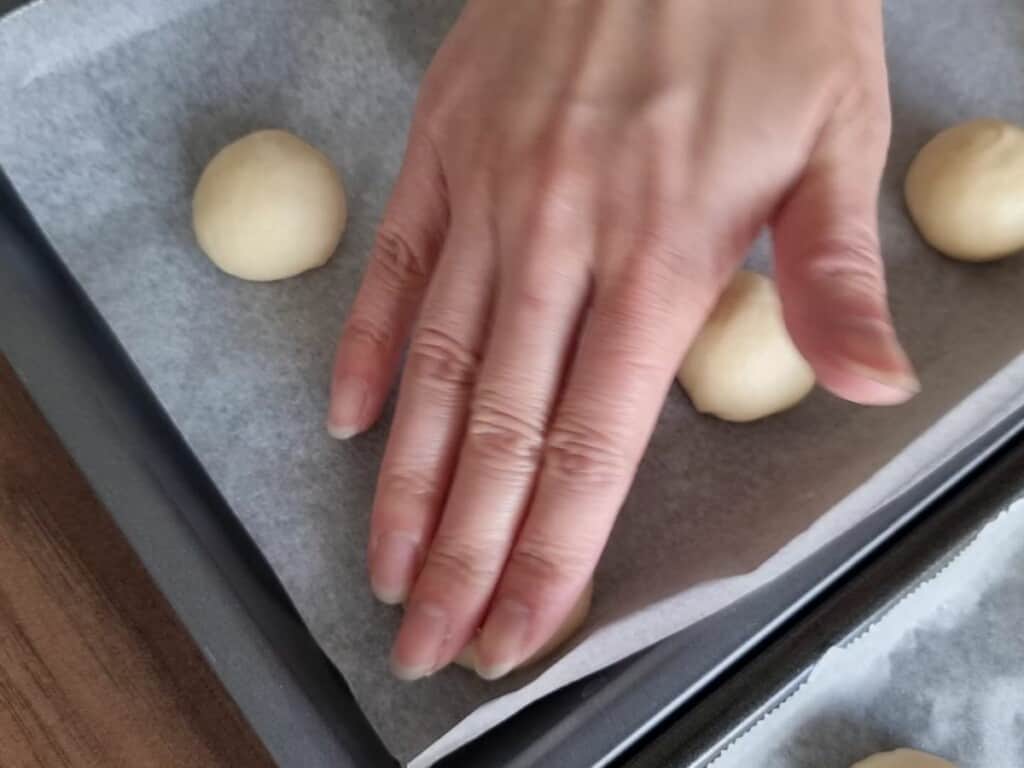
- Push dough half way down.
- Them leave them to do final ferment for 30 – 40 minutes or doubled in size in the warm place and cover with warp.
- Once dough finish the final ferment, then dough is ready to fry.
How to fry the Mini Donuts
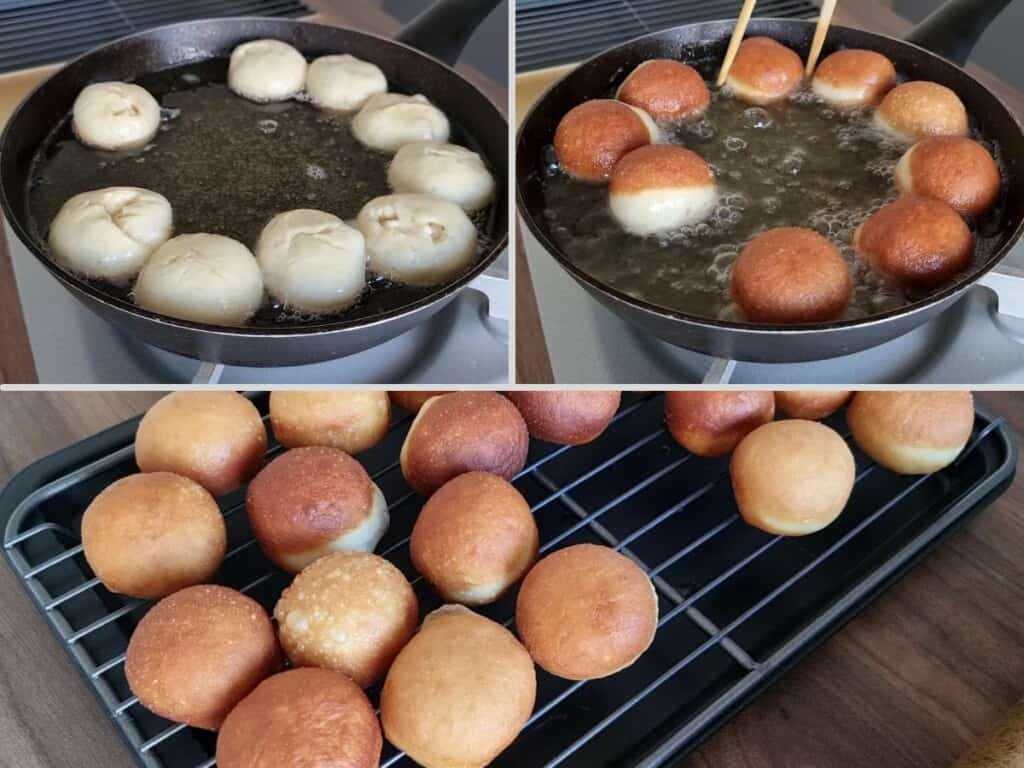
Add some cooking oil in a pan. Your oil should be enough when you add the dough, it won’t stick to the pan’s bottom. Use medium-low heat to heat the pan to 170°C, then add the dough, frying each side for 1 minute and 30 seconds until golden brown. Keep an eye on the temperature, if it goes too high turn the heat down to low heat. Then you will have perfect donuts.
Once the donuts cool down, you can start to decorate them however you like. You can also cover them with sugar and cinnamon, which will taste wonderful.
How to know the dough is fermented or not
Dust your finger with flour, and gently poke it into the dough, if the dough retains the finger hole when you pull your finger away, it is ready. If the dough springs back, let it rest longer. If the dough collapses then it has been rested too long.
How long can I keep those donuts
Keep the donuts in a cool and dark place and finish within 2 days or the bread will start to become hard. Homemade donuts do not add any food preservatives so it will go off quicker than the ones you buy from the supermarket.
Bakers percent
- 100 g Plain Flour(50%)
- 100 g Bread Flour or Strong Flour(50%)
- 3 g Salt(1.5%)
- 3 g Quick Yeast(1.5%)
- 24 g Caster Sugar( or 2tbsp)(12%)
- 40 g Egg(beaten)(20%)
- 80 g Warm whole fat Milk (40%)
- 20 g Unsalted Butter (10%)
Halloween Treats – Mini Donuts
Equipment
- 3 Mixing Bowl
- 1 Whisk
- 1 Spatula
- 2 Baking Tray
- 1 Oven
Ingredients
Dough
- 100 g Plain Flour
- 100 g Bread Flour or Strong Flour
- 3 g Salt
- 3 g Quick Yeast
- 24 g Caster Sugar( or 2tbsp)
- 40 g Egg(beaten)
- 80 g Warm whole fat Milk If it is warm day then just use room temperature milk, if it is a cold day you should use warm milk around 25°C – 30°C.
- 20 g Unsalted Butter Room temperature
Decoration
- 100 g Dark Chocolate or Milk Chocolate
- 100 g White Chocolate
- Edible Eyes
- White chocolate buttons
- Pretzel Sticks cut into 2cm
Instructions
Making Donuts
- In a mixing bowl add the bread flour, plain flour, salt, quick yeast and caster sugar, use your hand or whisk mix well. This is the dry ingredients. Next add the beaten egg into the milk, mix it then add into the dry ingredients.
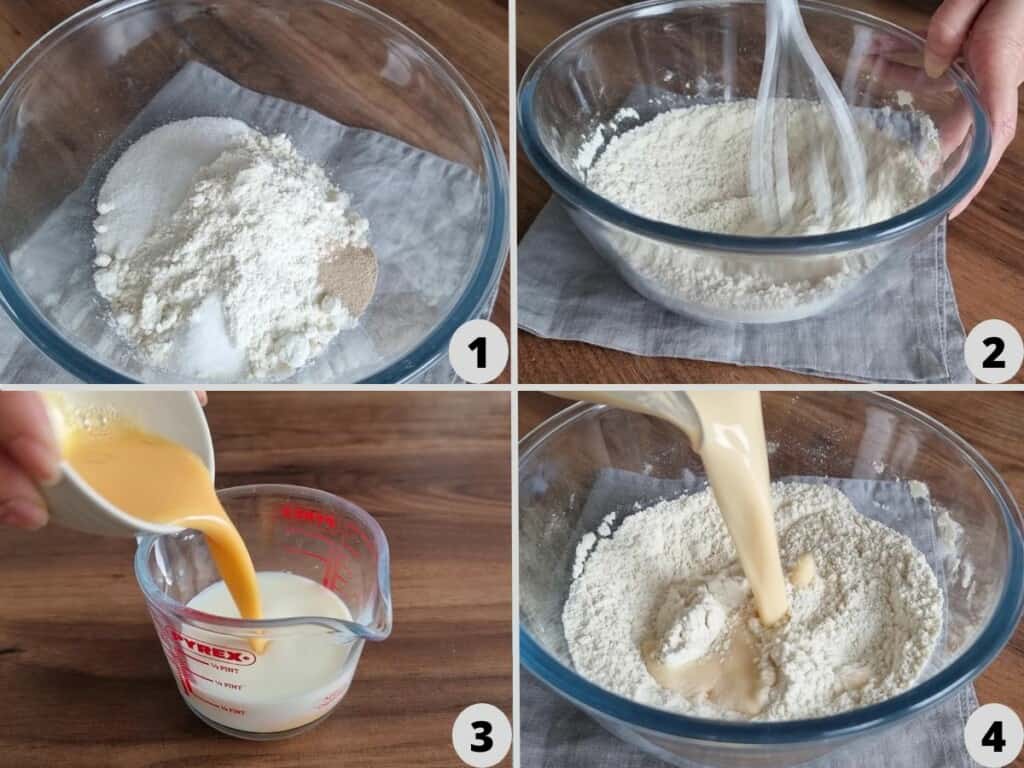
- Use your hand or Spatula give a good mix, once they gather together, turn it out onto the work surface.
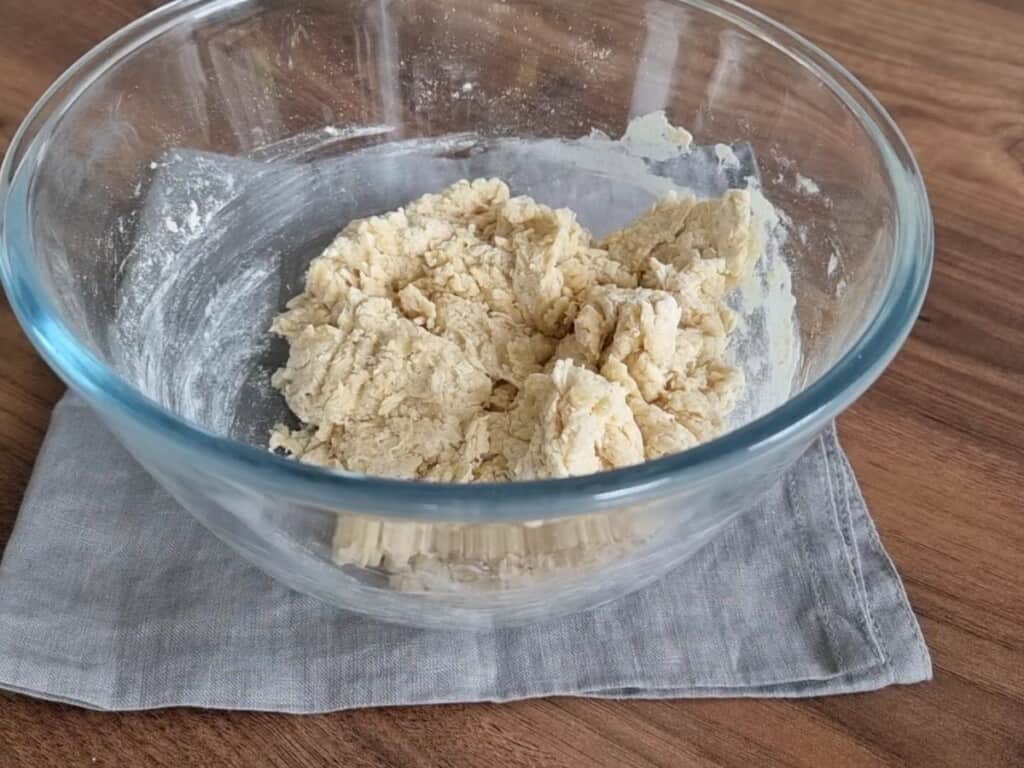
- Start to knead the dough for 3 – 5 minutes or until the gluten has formed.
- Next spread dough and add the unsalted butter, cover with the dough then start to knead it again for 10 minutes or until it becomes smooth. Then roll dough into a ball and put it back into the mixing bowl and cover with wrap. Leave the dough in a warm place to do the first ferment for 40 – 50 minutes or doubled in size.
- Once dough doubled in size, turn it out onto the work surface use your hand gentle push the air out and divide into 23 pieces, every piece around 15 to 16g.
- Then roll each piece into a small ball, and seal the bottom properly. Then place the balls onto baking trays with baking paper, give them space to grow.
- Next push each ball down to half . Then leave them to do a final ferment for 30 – 40 minutes or until doubled in size. Leave in the warm place and cover with warp.
- After ferment take off the wrap and leave the dough to dry a little bit, while preparing the oil.
- Add the frying oil into the pan with a medium low heat, heat to 170°C. Then gently pick up the donuts add into the pan (Put smooth side down), and fry each side 1 minute and 30 seconds or until two sides become golden brown. Remove them from the oil carefully and leave them to cool down on the rack .
Decoration make base
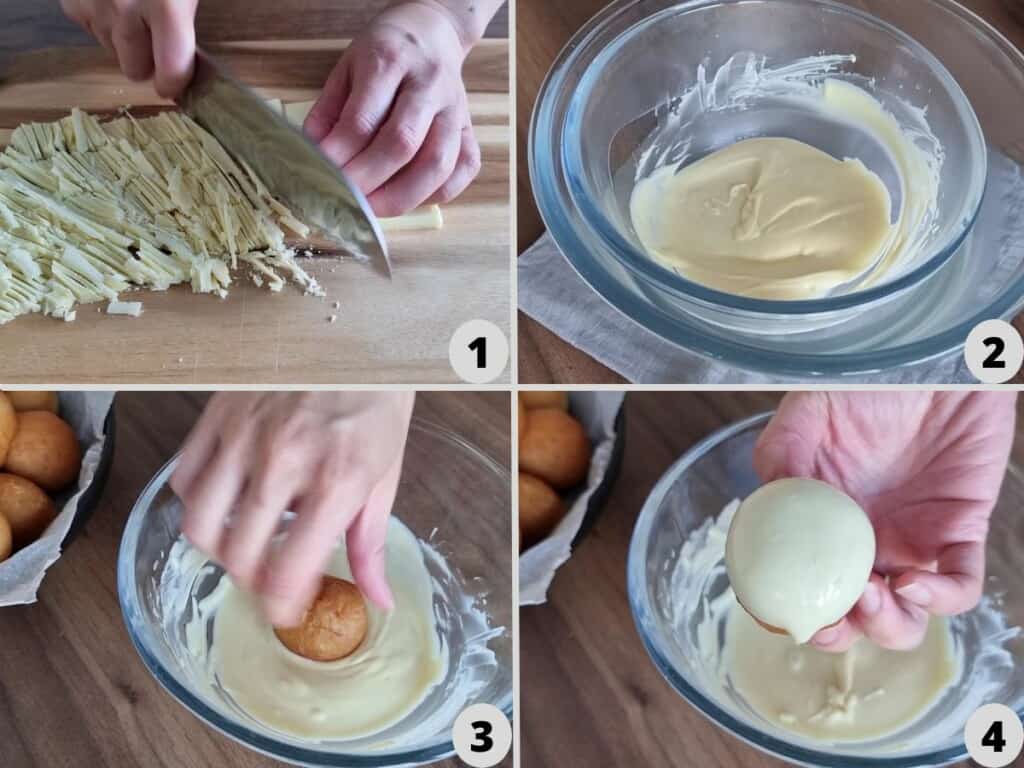
- Cut the white chocolate into small pieces, and place into a bowl and prepare another bowl slightly bigger and add some hot water (A bain-marie). Then put the white chocolate with bowl into the hot water bowl. Once chocolate melts smooth then you can dip the donuts in to the chocolate half way then pull it out. Do the same with dark/milk chocolate.I dip half donuts with white chocolate and half with dark chocolate.
- Then leave the chocolate to set.

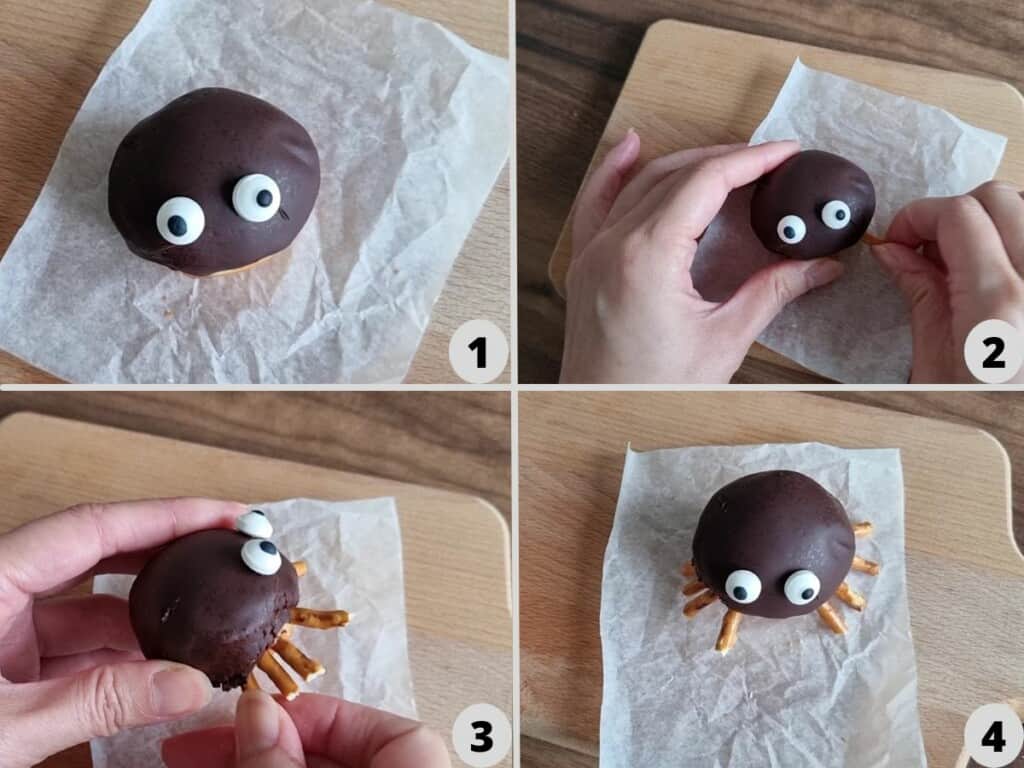
Making spiders
- Put the left over melted chocolate into a small bag and cut a small hole in a corner. Add some melted chocolate to the back of edible eyes and put them on the dark donuts as pictured, next on the side of donuts put 4 pretzel sticks on each side.
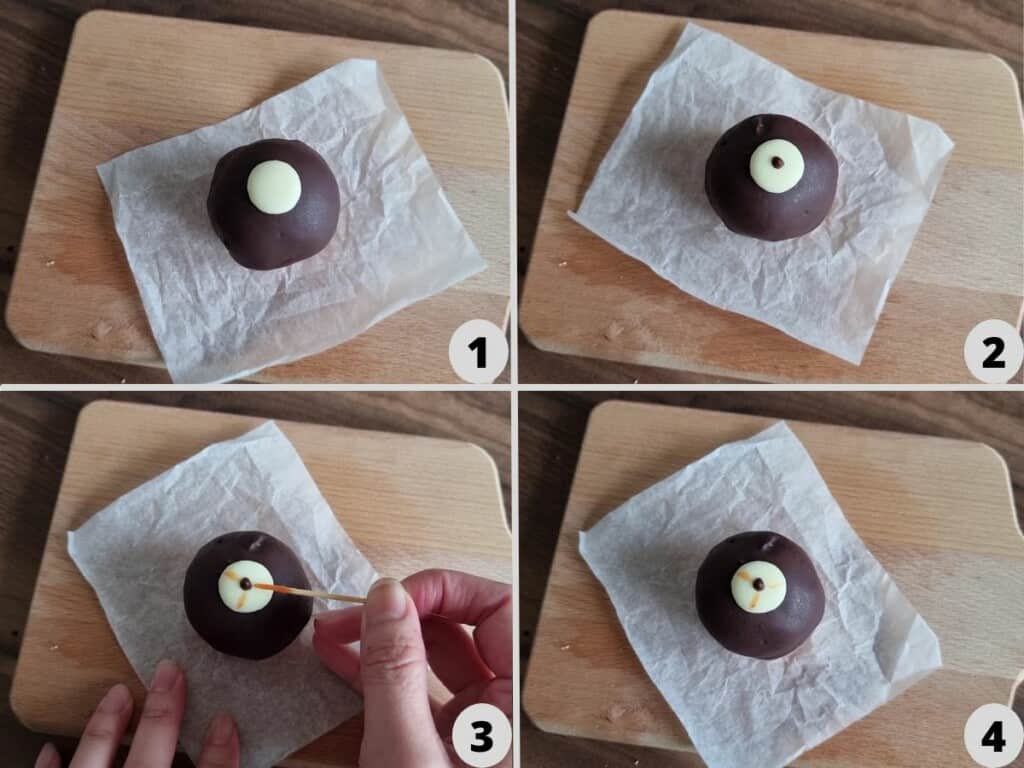
Eye Monster
- Use dark chocolate to stick the white chocolate button on the middle of the donut. Then add a little dark chocolate on the middle of the white chocolate button. Next use skewer or toothpick dip in the strawberry jam or any red colour jam and draw like some blood in the eyes as pictured.
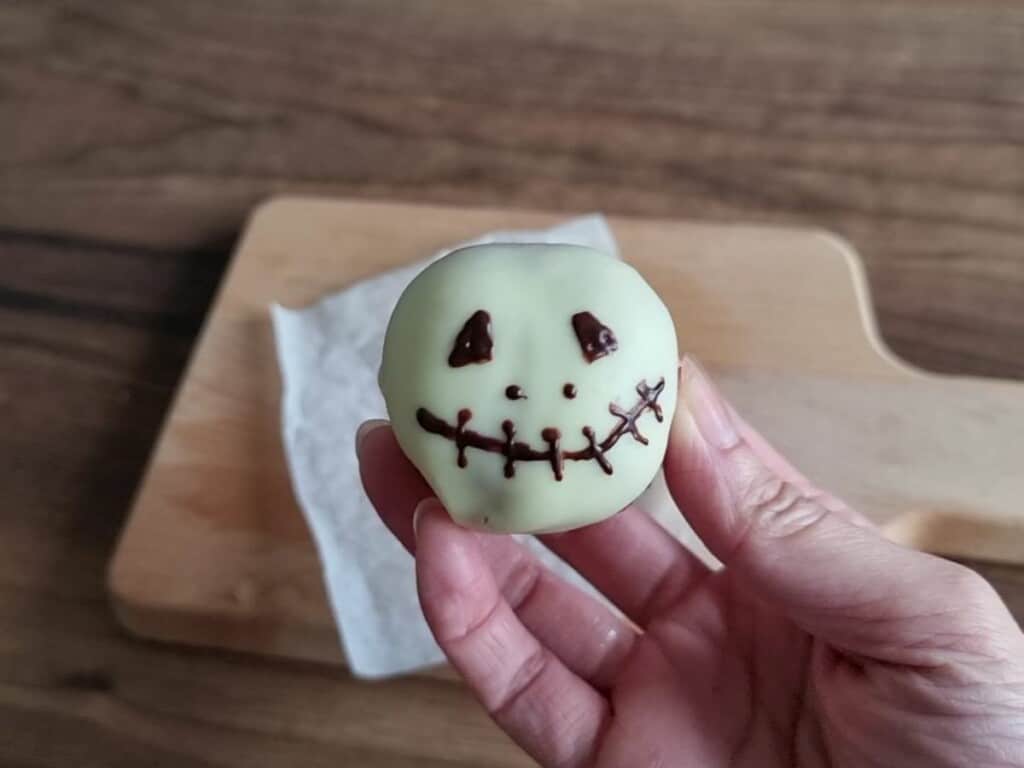
Jack Halloween face
- Use dark melt chocolate draw the face as pictured.
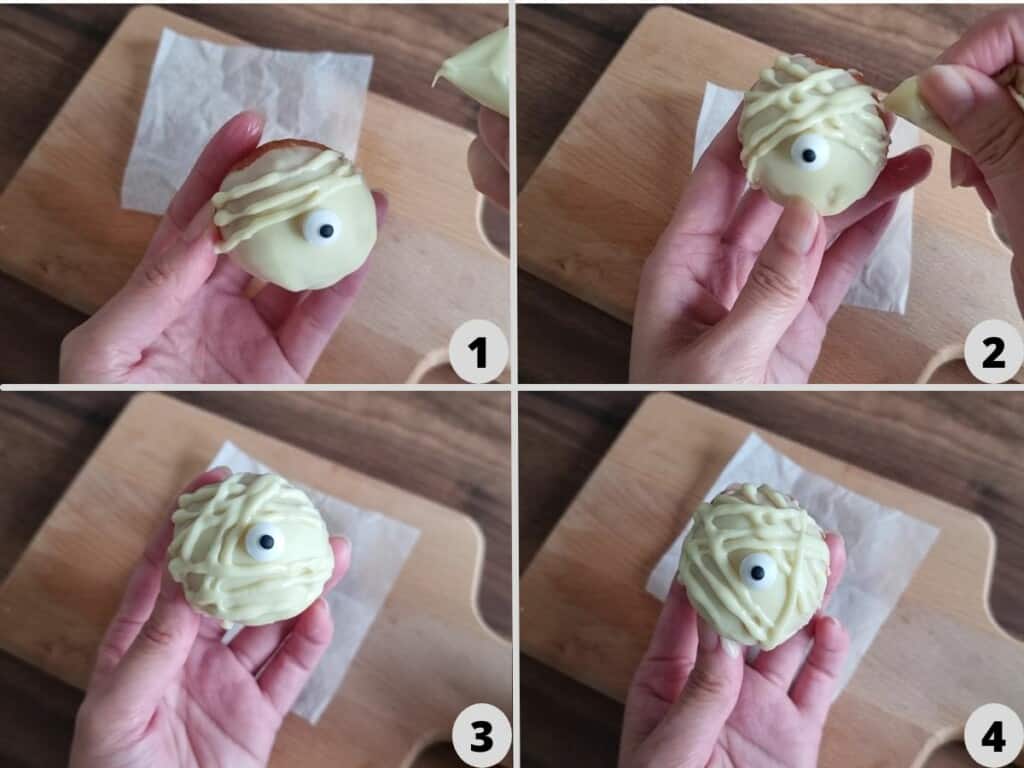
Mummy
- Use left over melted white chocolate, put it into a small food bag and cut a small hold in one corner. Add a little while chocolate on the back of edible eye, then stick it on the middle of the white donut. Next draw it as pictured.
- Then enjoy your Halloween's treats.